
Going through the trouble of changing your car’s battery only to find out all of your data is reset into default mode can be frustrating. Luckily, by taking a few simple steps, you can prevent your vehicle’s programming from being lost.
Here are 5 steps to change your car battery and not lose its settings:
- Gather your tools.
- Ensure your safety.
- Connect a secondary power source.
- Remove the old battery.
- Set up the new battery.
In the following sections, I’ll dive into how to go through each of these steps in the safest and most efficient way possible. Make sure to read the instructions closely and proceed with caution, as one wrong move can be more hazardous than you’d think.
1. Gather Your Tools
The first step of this process is to ensure you have all the necessary tools, most of which you’ll likely find already in your home. That’s why this method keeps the battery replacement costs at a bare minimum.
Here are the things you’ll need to change your car battery:
- Safety goggles
- A pair of insulating rubber gloves
- A backup battery of your choice
- A wrench
- Wires and jump leads
Although you won’t use the first two items on the list to directly aid the replacement process, I strongly recommend not skipping them. Since you’ll be working with electricity, ensuring the safest possible work conditions is of the essence.
2. Ensure Your Safety
As I mentioned, you shouldn’t start working on your battery until you’ve taken all necessary safety measures first. You can start by putting on a pair of non-static or ESD goggles that’ll keep you protected from any possible electrostatic discharge (source).
The second order of business would be putting a pair of gloves to prevent electricity transmission. Even though you can use a simple pair of plastic gloves if that’s what you have on hand, it’s not the ideal option. You’d want to look for a pair made out of insulating rubber to reduce the risk of a shock as much as possible.
I can’t overstate the importance of a high-quality pair of gloves. Not only can they protect you from unwanted electricity transmissions, but they also serve as a layer that keeps your hands clean and safe from any sharp or hot components.
Additionally, all car batteries contain a wide range of sulfuric acids and other corrosive materials, which can severely damage or burn your skin. A protective layer is crucial if you want to shield your hands from the elements that would come out in case of an unforeseen accident.
As you can see, the purpose of your gloves is threefold; therefore, I highly recommend investing in a good quality pair.
After putting on your protective equipment, you’ll want to make sure that the environment you plan on working in is clean and safe as well. The corrosive materials I previously mentioned are very prone to the production of flammable hydrogen, which is why a thorough check of your surroundings for any possible safety hazards could save your life.
Those looking to be as cautious as possible can throw a nasal mask into their safety gear for good measure. Sometimes highly toxic fumes can come out when replacing your car’s battery, in which case a layer that protects you from breathing them in would come in handy.
3. Connect a Secondary Power Source
Connecting a secondary power source is the process that’ll allow you to maintain the car’s programming and not lose your settings. By sustaining a small current of electricity throughout the car’s system while changing its battery, you’ll prevent it from completely resetting into default mode.
There are two ways you can go about connecting a secondary power choice.
- Use an auxiliary battery (12 volts) and jump leads (or a jump pack).
- Use a memory saver.
Whenever possible, you should take the first approach, as memory savers aren’t only more expensive but often less reliable. But let’s delve into the specifics of using both methods so that you can decide for yourself.
Using an Auxiliary Battery and a Jump Pack
This process is as straightforward as they come, but you’ll need to be extremely cautious at all times as a small mistake could cause an electric shock.
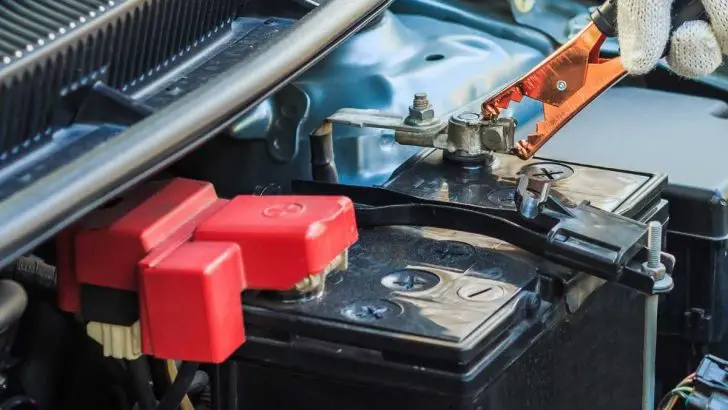
- Start by placing your 12-volt auxiliary battery on the ground near your car and differentiate its red and black leads.
- Connect the red lead to the positive terminal and the black one to the negative. This step is crucial for the procedure to work.
- Attach some crocodile clips to the end of each lead that you connected to the main battery. Remember to color match, as red should be connected to red and black to black. Also, the crocodile clips shouldn’t come in contact with each other.
- Double check if the clips are attached to the metal part of the lead, as otherwise, they might cause an electric shock when removing the latter from the main battery.
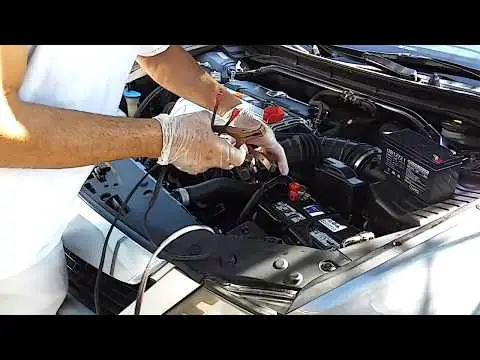
If you’re more of a visual learner, take a look at this video on how to go through this process as efficiently and safely as possible:
Using a Memory Saving Device
If you still prefer using a memory-saving device to keep your car’s information and settings, here’s what you need to know about the process.
- Purchase a 9-volt memory saver if you don’t already have one on hand. This Clore Automotive Solar Memory Saver Connector (link to Amazon) is a highly rated option that works as advertised. You can find many high-quality alternatives like this, but keep in mind that you’ll need to repurchase from time to time.
- After getting your hands on a memory saver, plug it into an accessory outlet that can sustain its current. This contraption will provide a steady stream of charge to your car’s system while you remove its battery.
When plugging the memory-saving device in, an indicator light should turn on to let you know the device is working and ready to use.
If the light isn’t turning on, this means that there’s no power reaching the device. In this case, it might be necessary to turn the car’s ignition switch to the “ACC” position. However, if the light still doesn’t turn on after doing so, you either have a faulty product or the electric current isn’t strong enough to sustain the memory saver.
Once you see that the light is turned on, indicating that the memory saver is ready to use, you’ll need to turn off all other vehicle accessories, including lights. This process is necessary to ensure that there’s no external device draining out the voltage in the memory saver, which would render the device unusable.
Now that the memory saver is providing the vehicle’s system with enough power not to shut down completely, you’re ready to proceed to the next step and remove the old battery.
4. Remove the Old Battery
After setting up the secondary power source, you can remove the old battery with peace of mind.
- Start by picking up a wrench or socket, which you’ll use to loosen the lug nuts that keep the battery in its place. After going through each of them, there won’t be anything left to hold the battery down.
- Alternatively, if your battery is secured through straps, loosen each of them before removing it from the tray.
- Start trying to take the leads off of the battery. This process requires a bit of care and precision, especially when removing the negative lead and detaching it from the existing battery.
- Lift the battery from the tray steadily and carefully, as you don’t want any corrosive acids spilling.
During this process, make sure to keep the crocodile clips firmly attached to the secondary power source, as otherwise, the system won’t have the required voltage to keep it running and prevent it from losing its programming.
Now that the old battery is completely removed, the temporary 12-volt auxiliary replacement or the memory saver is the only power source remaining, meaning that a slight disconnect between the clips and the metal could return all your settings to default. All your work at this point will have gone to waste.
How To Dispose of Your Old Battery
Make sure that you dispose of your old battery adequately, because as I mentioned, they can contain a wide range of harmful substances that can be dangerous when left out in an uncontrolled environment.
The safest way to get rid of the old battery is to take it to a local auto shop, as they’re much better equipped to handle these types of disposals.
If possible, try to return your battery to the store where you’ve purchased it at. Some auto shops often offer refunds on your core deposit if your return falls within the contract’s specifications.
Alternatively, you can choose to recycle the equipment, although this process will require some additional time and money.
Once you’ve disposed of your old battery, make sure to check for corrosion or damage around the place where you put the battery. If there’s any rust or residue, I highly suggest scrubbing out these areas with a wire brush. You can choose a store-bought cleaner for this purpose, but a simple mix of baking soda and water will work just as well.
However, when using the DIY alternative, be prepared for it to evaporate slower and leave more residue than its store-bought counterpart.
Once the area is clean, it would be best to add a coat of anti-corrosion solution before setting up the new battery to prevent any possible damage in the future. This Fluid Film Powerful Rust & Corrosion Protection (link to Amazon) won’t only protect your new battery, but it also has a special formula that can help salvage heavily-corroded surfaces.
5. Set Up the New Battery
Before starting the setup process, it’s essential to find the right type of battery for your vehicle. When shopping for a replacement, you’ll need to keep in mind your car’s make, year, model, engine size, and trim level.
After the area’s prepped and you have the right type of battery in hand, it’s time to set it up.
- Start by carefully placing it into the tray while making sure not to touch any of the contacts used to supply the car with power.
- After placing the battery, connect the positive terminal to the red and the negative terminal to the black.
- Remove the crocodile clips since the new power source is now connected.
All that’s left to do is secure the device in place. To do so, tighten the battery tray bolts until you feel the battery is strongly attached to the car. You can also remove the 12-volt auxiliary battery or memory saver since the primary power source should be completely set up at this point.
Next, it’s time to start your car for a test run to ensure that the new battery is properly working and that you’ve saved your settings throughout the process. An excellent way to assess your work is to open the radio.
If you’ve followed the procedure correctly, the radio will start working as usual, and you won’t need to reconfigure it with its code. If this happens and the car runs as it should with the newly-installed battery, you’ve managed to successfully change your vehicle’s power source while not losing its settings.
Overall, the entire process shouldn’t take more than 30 minutes, but remember to exercise constant caution and patience throughout the whole thing.
Final Thoughts
Car batteries can be challenging and sometimes dangerous to handle. That’s why replacing them can be a delicate process that requires care and attention, especially when trying not to lose your vehicle’s settings.
However, if you take precautionary measures, pay close attention to the instructions, and dispose of the old equipment accordingly, replacing your car battery doesn’t have to be a hardship. By following a simple 5-step procedure, you’ll be able to set up a new power source safely in no time.