
Voltage regulators are a necessary evil in the world of generators. They keep your appliances safe by preventing power surges and dips. But what happens when your voltage regulator fails?
Here’s a step by step guide on how to test a voltage regulator:
- Check the generator fluids.
- Start the generator.
- Set the voltmeter to the AC Voltage position.
- Put the black lead on the generator frame.
- Put red lead on the generator’s output plug.
- Check the voltage.
- Check the frequency.
- Check the phase sequence.
- Plug a series of loads into the generator.
- Switch off the loads one by one.
- Let the generator run for one hour.
- Turn off the generator.
Let’s look at each of these steps in more detail. Hopefully, this article will help you understand how to test a voltage regulator all on your own, even if you have limited previous knowledge or experience.
1. Check the Generator Fluids
You’d be surprised to learn how many issues low oil or coolant can cause to your generator. We’re talking about seizures, overheating, and other (probably very expensive) problems. Make sure all of the fluids are at the correct levels before starting the generator (source).
Here’s the thing:
If the oil level is too low, the generator won’t be able to lubricate itself properly. This will cause all sorts of issues, including an underperforming motor. When this happens, your stator and rotor may not work as efficiently, resulting in voltage issues.
The same goes for the coolant. If its level is too low, the generator won’t be able to keep itself cool. This can cause an overheated engine that can lead to voltage drop issues.
After checking the fluids, remove the generator cover to access the stator and rotor.
2. Start the Generator
This might seem obvious, but you need to ensure that the generator is turned off before you start testing it. Once you’ve checked the fluids and everything looks good, go ahead and start the generator.
However, you want to start it outdoors because it can produce an unhealthy amount of carbon monoxide when running. Inhale enough of this harmful gas, and you could end up feeling dizzy, lightheaded, or short of breath. This can be particularly dangerous when handling cutting or pneumatic tools.
Warning: It is important to understand that you should never touch the generator while it’s running. The engine produces a lot of heat, and the moving parts can cause serious injuries if not handled correctly.
3. Set the Voltmeter to the AC Voltage Position
Now that the generator is running, it’s time to test the voltage regulator. You’ll need to set the voltmeter to AC to do this. The reason for this is that most generators produce alternating current (AC). This type of current alternates between positive and negative values. So, if you set the voltmeter to any other reading, you will blow a fuse or even damage the device.
The same applies to DC generators, you have to set the voltmeter to DC or you’ll be risking damage.
4. Put the Black Lead on the Generator Frame
Once you’ve set the voltmeter to AC, it’s time to attach the leads. The black lead should be attached to the generator frame. If you’re not sure where the generator frame is, it’s the metal part that the engine is mounted on. Skip this part, and you could get false readings that can result in unnecessary repairs.
5. Put the Red Lead on the Generator’s Output Plug
The next step is to attach the red lead to the generator’s output plug. This is the plug you’ll use to connect the generator to your house.
Ideally, test all the outlets on the generator. This will give you a more accurate reading of the generator’s output. You will also know if you are dealing with a broken outlet.
6. Check the Voltage
The ideal voltage for most generators is 120 volts. If it is lower than this, the generator isn’t producing enough power.
This can be caused by several issues, including a bad stator, failing AVR, or an issue with the motor.
If the voltage is higher than 120 volts, the generator is overproducing power. This can damage your appliances.
It’s also worth noting that the voltage may fluctuate slightly while testing it. This is normal and nothing to be concerned about.
7. Check the Frequency
A generator’s frequency indicates how often the current changes direction. For most generators, the ideal frequency is 60 Hz. If the frequency is lower than this, the generator isn’t producing enough power.
To test this, you’ll need a frequency meter. First, connect the meter’s black lead to one of the generator’s negative terminals. Then insert the red lead into each of the three positive terminals. Make a note of the reading for each one.
If the readings are all the same, the frequency is correct. If they’re different, the generator may not be producing enough power.
8. Check the Phase Sequence
The phase sequence is the order in which the voltage peaks occur. For most generators, the ideal sequence is 1-2-3. The first positive peak should occur at terminal 1, the second at terminal 2, and the third at terminal 3.
If you don’t have a digital multimeter, you can use a regular voltmeter. First, connect the black lead to one of the generator’s negative terminals. Then clip the red lead to each of the other two terminals. Make note of the reading for each one.
At this point, you already have a good idea of how well the AVR is working. If the voltage is below 115, you need to replace the AVR. However, if you don’t have a multimeter, proceed to #9.
9. Plug a Series of Loads Into the Generator
The best way to test a generator is to use it. Plug in a series of loads and see how the generator handles them.
Start by plugging in a light bulb. If the generator can power the light bulb, try adding another load, such as a hair dryer or an electric drill.
Ideally, you should test the generator under a variety of different conditions. This will give you a good idea of its capabilities and any areas that need improvement.
If you notice that the generator struggles to power the loads, you can try these approaches:
- Check the fuel level. If the generator is low on fuel, it won’t be able to produce enough power.
- Check the air filter. A dirty air filter can restrict airflow and prevent the engine from running at its full potential.
- Check the spark plug. A faulty spark plug can prevent the engine from starting or running properly.
- Check the oil level. If the oil level is low, the engine will overheat and eventually seize up.
- Check the cooling system. If the cooling system isn’t working correctly, the engine will overheat and eventually seize up.
If none of those solve the problem, you might be looking at a faulty AVR that needs a replacement.
10. Switch Off the Loads One by One
After you’ve tested the generator under various conditions, it’s time to switch off the loads one by one.
Start by switching off the light bulb. Then, switch off the heavier loads like the hair dryer or electric drill. This will give you a rough idea of how much power the generator can handle comfortably.
11. Let the Generator Run for One Hour
Let the generator run for one hour once you’ve finished testing tit. This will allow you to see how it performs over an extended period.
After the generator has been running for one hour, check the oil level and add more if necessary. You should also check the coolant level.
Moreover, monitor the voltage output during this time. If the voltage drops below 120V, the AVR is not working correctly and may need to be replaced.
12. Turn Off the Generator
Once you’ve finished testing the generator, it’s time to turn it off. Switch off the fuel supply and let the engine run until the fuel runs out.
After the engine has stopped, disconnect the negative lead from the battery and let it cool down. You are now ready to replace the AVR in your generator.
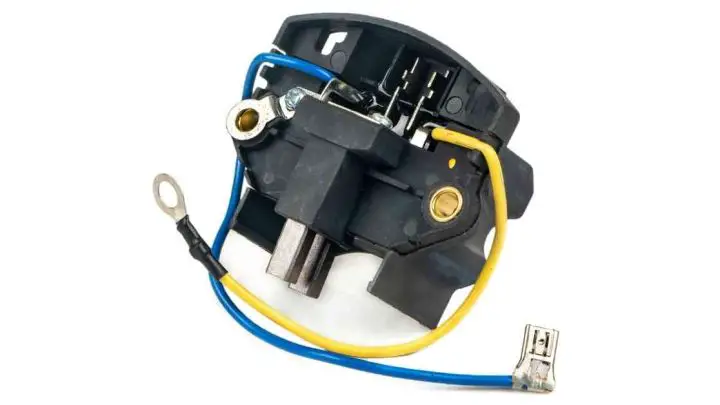
Fixing the Problem
If the multimeter test you did in steps six through eight showed that the AVR is not producing the proper voltage, you’ll need to replace it. Fortunately, this is a relatively easy task that almost anyone can do.
- Disconnect the negative lead from the battery.
- Remove the generator cover.
- Remove the four screws that hold the AVR in place.
- Unplug the wires from the old AVR and plug them into the new one.
- Secure the new AVR.
- Put the cover back on and bolt it in place.
- Connect the negative lead to the battery.
Once you’ve replaced the AVR, test your generator to make sure it’s working correctly. If it is, you’re all set. If it’s still not working, you may need to take it to a professional for further diagnosis.
When Your Generator Has a Capacitor Instead of an AVR
If your generator has a capacitor instead of an AVR, testing it might look a bit different.
- Disconnect the negative lead from the battery.
- Remove the generator cover.
- Locate the capacitor (it will look like a large cylinder).
- Test the capacitor with a multimeter. The multimeter should show a reading of 0.5 ohms or less. If it shows a higher reading, the capacitor is faulty and must be replaced.
- Connect and secure the new capacitor.
- Put the cover back on and bolt it in place.
- Connect the negative lead to the battery.
Once you’ve installed the capacitor, start the generator and let it run for a few minutes. If the voltage is still low, the problem may be with the stator windings or the field coils. These are much more difficult to test and diagnose, so you’ll probably need to take your generator to a professional for further diagnosis.
Choosing an AVR for Your Generator
You need to consider a few things when choosing an AVR for your generator.
- Voltage output of the AVR. The output should be compatible with the voltage output of the generator.
- Current rating of the AVR. This rating should be equal to or greater than the maximum current output of your unit.
- Frequency of the AVR. Make sure your old and new AVR frequencies are precisely the same.
- Size of the AVR. The AVR should be small enough to fit inside the generator’s housing.
- Price of the AVR. The AVR should be within your budget.
You can find this information in the generator’s manual or from other generator owners. Once you have the correct info, shop for a quality part online or in a local parts store.
However, buying online is usually your best bet because you can find a wide variety of options. You can also find the best deals online. The only downside is that the part can take longer to arrive in the mail.
Additionally, be sure to buy from a reputable seller. There are a lot of counterfeit parts on the market, and you don’t want to end up with one of those. A fake part will not work correctly and could damage your appliances.
If you are interested in testing the new AVR before installing it, you can use a voltage regulator tester. You want to see a reading of 0.5 Ohms or less on the multimeter. If you see a higher reading, the new AVR is faulty.
Final Thoughts
Testing a generator voltage regulator is a relatively easy task that almost anyone can do. You’ll need a few tools, including a multimeter, but other than that, the process is pretty straightforward.
In this article, I have also shared some tips on choosing an AVR for your generator. Consider the voltage output, current rating, frequency, size, and price of the AVR before making your purchase.
Recommended Reading