
Replacing a 2-stroke cylinder sleeve can be pricy if you take it to a professional. Although they will make sure the job is done right, many people want to replace the sleeve themself.
Replacing a 2 stroke cylinder requires removing your previous sleeve by heating your cylinder and forcefully removing the old sleeve. Once the old sleeve is removed, heat the cylinder and freeze your new sleeve. Then cover the sleeve and cylinder with oil, and you should be able to insert the sleeve easily.
This might sound easy, but you want to make sure you know every step in detail before doing this yourself. So, in order to get the job done right, read the following steps on how to replace your cylinder sleeve.
And please be sure to read the section titled DIY Vs Professional Sleeve Replacement near the end of this article. Although I’m sharing a process for doing this yourself, I’m not condoning it if you don’t know what you are doing.
Preheat Your Old Cylinder in The Oven
The first step to replacing your 2 stroke cylinder sleeve is to make sure your cylinder is prepped and ready for you to remove the old sleeve inside.
You will need the following materials to preheat your cylinder:
- Cylinder
- Penetrating oil
- Heat resistant gloves
- Regular home oven
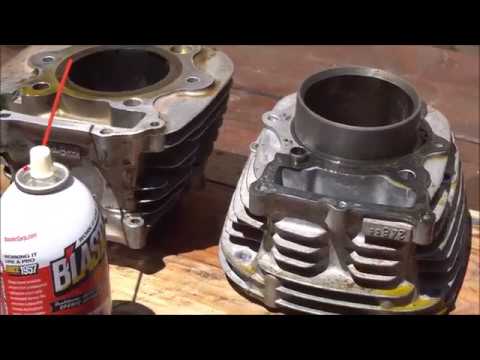
Start by spraying your penetrating oil on both the top and bottom of your cylinder and let the cylinder sit for up to an hour to make sure the oil fully penetrates both top and bottom.
Note: I have never done this but I did find someone on YouTube who has. Here’s his video and then we will get into the steps:
- While your penetrating oil is doing its job, you want to go ahead and preheat your oven to 350 degrees on the bake setting.
- When you’re finished letting the oil penetrate, you can go ahead and stick the cylinder in without needing to wait.
- Place the cylinder on the top rack inside the oven when it has reached 350 degrees.
- Heat for about 15 minutes.
- After the 15 minutes, go ahead and put on your heat-resistant gloves to remove the cylinder and place it onto the top of your oven.
It’s important for you to know that your oven and home will start to smell like the penetrating oil you sprayed on earlier, so it’s a good idea to have either your door or windows open. I had a buddy years ago that had an oven in his shop. I asked him what it was for one time and he said, “to cook things my wife won’t let me cook in the house”. This would fall in that category.
It’s not recommended for you to be in an enclosed space during this period.
Now you’re ready to transfer your cylinder to your workstation, where you will work on removing the old sleeve.
Because the cylinder is heated it expands slightly and should eliminate any friction when trying to remove the old sleeve.
Before actually transferring your cylinder, it is recommended to place a large piece of wood underneath the cylinder so that you don’t end up damaging your work table.
Remove the Old Sleeve From The Cylinder
To remove the old sleeve, you will need the following materials for the best results:
- 1 large piece of wood for the cylinder to rest on top of
- 2 small rectangle pieces of wood blocks to lift the cylinder slightly off the ground
- 1 piece of woodblock large enough to cover the base of the sleeve
- Heat resistant gloves
- 1 mallet
- Possibly a long piece of rebar
Below are the instructions on removing your old sleeve.
- Using your heat resistant gloves, place the two small rectangle wood-block pieces underneath the cylinder but on the left and right side.
- Make sure to leave space in the middle for the sleeve to come out.
- Place the larger woodblock piece on the base of the sleeve, and you will use this as a way to protect your old sleeve from damage as you attempt to remove it.
- Take your mallet and start to hit the woodblock resting on top of the sleeve.
- You will have to strike the wood piece with a significant force for the sleeve to start moving out of the cylinder.
Your sleeve should break free from the cylinder pretty easily, but if it does get stuck in the middle of your cylinder without full removal there are some options for getting it out the rest of the way.
- If your sleeve is stuck inside the cylinder you will need to add some larger wood blocks on the bottom but make sure the cylinder is stable and won’t move around.
- Take your piece of rebar and start to strike the sides of the sleeve to force it out of the bottom of the cylinder.
Be careful not to damage the inside of the cylinder while using the rebar so that when you replace it with the new sleeve it will still fit perfectly.
At this point, your old sleeve should be removed from the cylinder and you’re ready to insert a new one.
Freeze Your New Sleeve And Heat Up Your Cylinder
Now that the old sleeve has been fully removed, you are ready to go ahead and prep your new sleeve and old cylinder.
- But before you heat up your oven you want to place your new sleeve inside the freezer section of your refrigerator.
- You’re going to want to freeze the sleeve for up to an hour. The longer the better.
The reason you are doing this is that you want to compress the sleeve so that it shrinks in size as much as possible. When most objects get colder, they will become slightly smaller in size, and the reverse is also true.
- When you heat up your cylinder it will increase in size and be larger so that your smaller sleeve will fit with little resistance.
- About 40 minutes into freezing your sleeve you can go ahead and preheat your oven to 350 degrees.
- Once it reaches full temp go ahead and stick your cylinder inside and heat up for about 15 minutes.
- After the full hour is up, you can remove both pieces to set up in your workstation.
Make sure you are wearing your heat-resistant gloves because the cylinder will be pretty hot when removing.
You are one step away from replacing your 2-stroke cylinder sleeve, and all you need to do is put in your new sleeve.
Grease Sleeve and Put into Cylinder
Once your sleeve has been in the freezer for up to an hour and your cylinder is heated up and both are in your workstation; all you need to do is apply some oil to the outside of the sleeve and the inside of the cylinder.
Make sure to rub the oil on the entire surface of the outside of the sleeve and the inside of the cylinder to ensure that the process goes smoothly and no parts get caught.
Place the sleeve inside the cylinder and if you have followed all prep steps your sleeve should easily fit without needing to use your mallet or any force.
It’s important to keep in mind that if you have any doubts about this process or if you are worried about damaging your parts that it is probably a better idea to consult a professional.
But if you have a lot of experience with cylinders and even replacing sleeves, this could be an easy way to save the expense of hiring someone.
DIY Vs Professional Sleeve Replacement
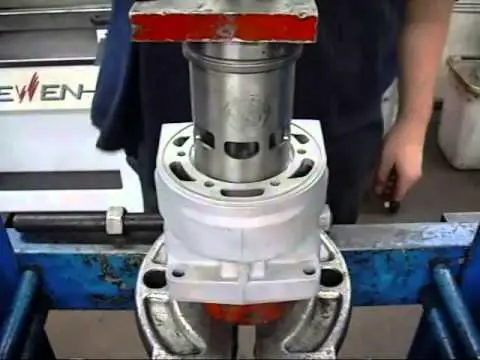
This project can potentially be a cost-saving approach but there are quite a few caveats. Improper heating and risk of fire all stand to result in potential damage. Professional replacement is probably advisable in most circumstances. Those guys have the proper tools and training to do the job right without the risk of damaging your engine. For example, look at this YouTube video and how smooth this process goes when a qualified mechanic with the right tools does the job.
Summary
Replacing a two-stroke cylinder sleeve is a doable DIY project if you have some understanding of what you are doing and the risks involved. But if you don’t have experience with fixing 2-stroke parts or are worried that you’ll ruin your cylinder in the process it’s best to find a trusted professional in your area.